 The Interoperability Standard
for Industrial Automation
| Welcome | OPC Foundation Online | Certification | Technology | News | https://gitHub.com/OPCFoundation |
Unified Architecture Technology Sample Applications
 The Interoperability Standard
for Industrial Automation
| Welcome | OPC Foundation Online | Certification | Technology | News | https://gitHub.com/OPCFoundation |
Unified Architecture Technology Sample Applications
This document describes a step by step procedure for establishing a secure connection over the HTTPS protocol between an OPC UA Server and an OPC UA Client developed with the .NET stack provided by OPC Foundation.
The OPC UA 1.02 .NET Sample Applications package needs to be installed on the local machine.
This will deploy the UA Sample Server, UA Sample Client, and UA Configuration Tool applications that are needed for this procedure.
The package can be downloaded from the OPC Foundation website.
In order to be able to establish a secure connection the SSL binding needs on the machine where the server application is running. This can be performed using the UA Configuration Tool application.
An HTTPS connection requires a certificate to be used for performing the message encryption. This certificate is different than the application instance certificate of the server.
In a real scenario (e.g. a web site) the HTTPS certificate (or SSL certificate) is issued and signed by a worldwide trusted Certification Authority (e.g. VeriSign, DigiCert) because it should be validated and trusted by the operating system before establishing a connection. For Windows operating systems this means the certificate of the issuer should be in the “LocalMachine\Root” store in order to be considered trusted. This store already contains a list of known CAs (like VeriSign and DigiCert) and the certificates issued by them will be automatically trusted.
In our example we will create our own CA and we use it to issue the HTTPS certificate. After that we will manually copy the CA certificate to the “LocalMachine\Root” store on the machines where the UA client application will run. In this way the HTTPS certificate will be considered trusted by the operating system (i.e. issued by a trusted authority) and we do not need to purchase an HTTPS certificate from an authority.
On a machine where OPC UA 1.02 .NET Sample Applications is installed, perform the following steps:
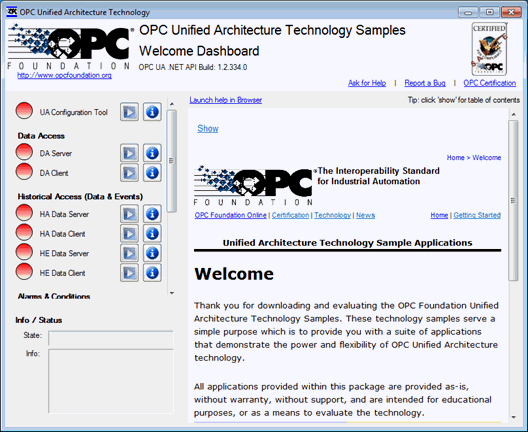
The application can be used for launching/stopping the other applications (Sample Client, Sample Server, Configuration Tool…) and can be found at Start -> All Programs -> OPC Foundation -> Unified Architecture -> 1.02 -> Sample Applications -> OPC UA Dashboard.

From the Configuration Tool application select the “Manage Certificates” tab and create a new CA certificate the using the “Create Certificate Authority" button.
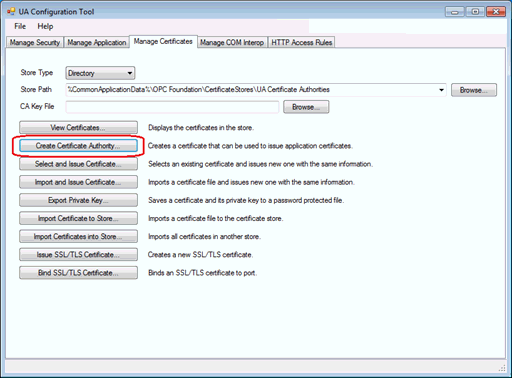
Save the certificate somewhere on the disk (e.g. “D:\HTTPS”) and specify a password. In our example we use opcf as password.

From Configuration Tool:
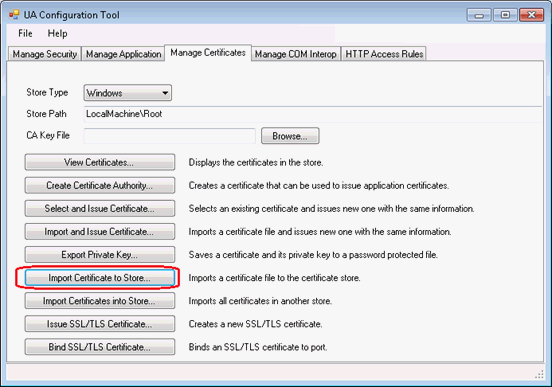
Select the “Manage Certificates” tab
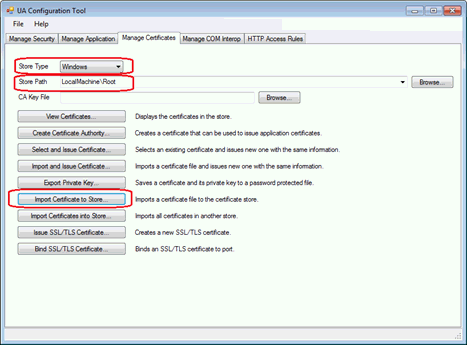
Set StoreType to Windows
Set StorePath to LocalMachine\Root
Click the “Import Certificate to Store” button
Browse to the public key file of the previously create CA certificate. In our example this should be the “D:\HTTPS\certs\OPCF [0FF56F5……..].der” file (with the specific thumbprint at the end).
Click “Open”.
Click “Yes” when receiving a warning message like “You are adding this certificate to a trust list that may be shared…”
From Configuration Tool:
Select the “Manage Certificates” tab.
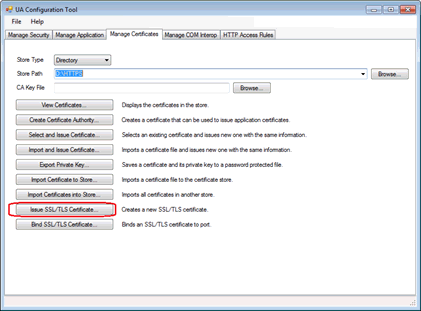
Set StoreType to Directory
Set StorePath to D:\HTTPS
Click the “Issue SSL/TLS certificate button…”.
In the displayed dialog set StoreType to Directory.
Set StorePath to “D:\HTTPS”.
Specify the CA key file: browse to “D:\HTTPS\private” and specify the private key of the CA file (created in step nr. 3).
Specify the password of the CA private key file (in our example is opcf).
Leave the default value for Domain Name (the name of the local machine).
Click OK
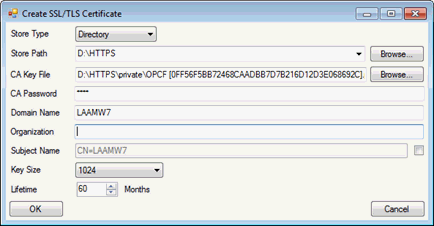
From Configuration Tool:
Select the “Manage Certificates” tab.
Click “Bind SSL/TLS Certificate”.
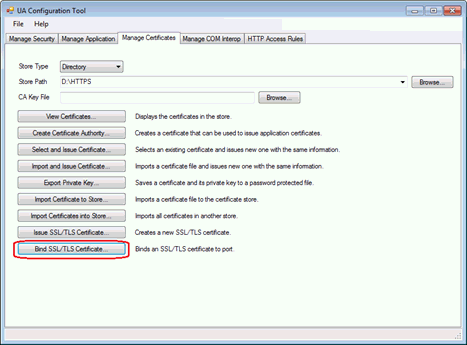
On the displayed dialog click “New”.
On the new dialog, leave the IP Address as “0.0.0.0”
Set the Port value to 51212 (the default HTTPS port for Sample Server)
Specify the Certificate by browsing the certificate created in the step nr. 5. It should be located “D:\HTTPS\” and it has the name of the local machine.
Click OK.
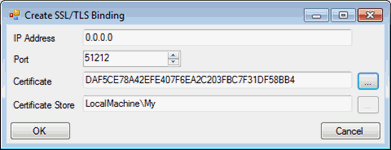
Click “Yes” when receiving the revocation status related warning.
Click “No” when receiving the “Delete certificate from current location…” message.
In this moment UA Sample Client should be able to establish an HTTPS connection with UA Sample Server.
From the Dashboard application launch Generic Server and Generic Client. This should start UA Sample Server and UA Sample Client.
From the menu bar of UA Sample Client click Discovery -> Servers
Double-click on the “UA Sample Server” record line of the displayed dialog
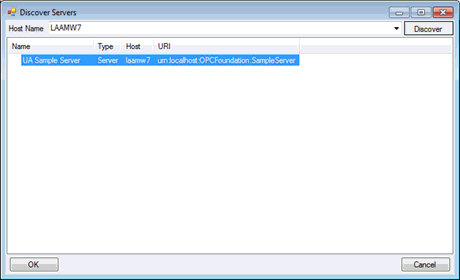
Click “Connect” (in the main form of UA Client).
In the Protocol field select the value “HTTPS”.

Click OK.
Click OK in the “Session Open” dialog.
An HTTPS connection should be established now between Sample Client and Sample Server.

If the client application runs on a different machine the CA certificate (the certificate generated at step nr. 3) needs to be copied to the LocalMachine\Root store of the client machine.
The Configuration Tool application should be used on the client machine to add the CA in the list of Trusted Root Certification Authorities.
Follow these steps:
Copy the public key of the CA certificate on a disk location from the client machine. The file should be located at “D:\HTTPS\certs\ OPCF [0FF56F5BB72…….].der” on the server machine. The thumbprint part of the file name may be different.
Launch Configuration Tool application on the client machine.
Select the “Manage Certificates” tab
Set StoreType to Windows
Set StorePath to LocalMachine\Root
Click the “Import Certificate to Store” button
Browse to location where the CA certificate was copied on the client machine.
Click “Open”.
Click “Yes” when receiving a warning message like “You are adding this certificate to a trust list that may be shared…”
In this moment a UA Sample Client instance running on a remote machine (a machine different than the server machine) should be able to establish an HTTPS connection with UA Sample Server.